Adaptive Equipment for Classrooms Series: Part 1 of 3
| February 2016This post is the first in a series of articles on the topic of adaptive equipment use in the classroom. Adaptive equipment, used appropriately, serves as a teaching tool for students to learn the motor skills of sitting, standing, and walking, while engaged in the curriculum. This post focuses on active sitting as a motor skill.
Adaptive Equipment for Classrooms Series: Part 2 of 3
Adaptive Equipment for Classrooms Series: Part 3 of 3
The 5 Principles of Using Adaptive Equipment in the Classroom
 Adaptive equipment plays an important role in classroom positioning for children with disabilities, supporting a child so that he or she can practice motor skills while engaged in the curriculum. Equipment, in this capacity, is used as a teaching tool for sitting, standing, and walking rather than a substitution for motor skills a child may lack. Linda Bidabe, special education teacher and founder of the MOVE program, suggests there are five main principles to describe the rationale behind the use of adaptive equipment in the classroom:
- The equipment places students in positions for performing functional activities such as moving from one place to another, self-feeding, self-controlled toileting, table work, and leisure activities.
- The equipment allows the staff to physically support the student while teaching appropriate movement patterns.
- The equipment has been designed so that assistance can be reduced as the student gains motor skills.
- The equipment allows the student to practice their motor skills independently.
- The equipment is designed to help improve the bone and joint health of the students and to increase the muscle strength of the extensor musculature of the body.
The most frequently used supports within the educational environment for children with disabilities are for sitting, standing, and walking. This three-part series on classroom positioning will explore each of these areas in detail, starting with Tips for Teaching Classroom Sitting.
Then look forward to the next two posts: The Benefits of Classroom Standing and The Role of Ambulation in an Educational Environment appearing over the next couple of weeks.
Tips for Teaching Classroom Sitting
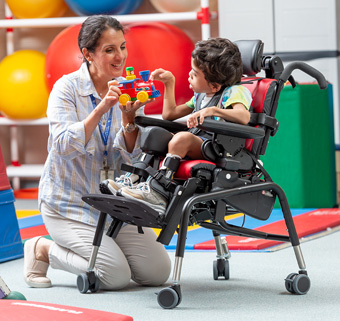
Perhaps the most important goal for adaptive classroom seating is achieving a front-leaning sitting position with forearm weight-bearing. Supporting a child in this position encourages active head control as well as making breathing, coughing, and vocalizing easier.
Some of the most important prompts for this position include arm prompts (for forearm weight-bearing) and a firm anterior trunk support. Knee blocks (or something similar) are also very helpful for positioning some students. Sometimes, all it takes to create a front-leaning chair is a little creativity. Ideas for supporting children in the forward-leaning position include:
- A regular chair with a separate chair frame supplying the trunk and arm prompts for forward leaning.
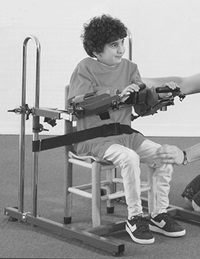
- A regular chair with a gait trainer supplying the trunk and arm prompts for forward leaning.
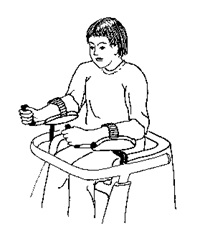
- A table-mounted forearm prompt (especially useful if the child has greater trunk control and needs one arm stabilized in sitting).
- Specially designed adaptive chairs for forward leaning.
Remember that this kind of sitting support is intended to help the child learn; it is not a chair for sitting in all day in the classroom! In fact, equipment that allows the child to be supported in either a leisure sitting (leaning against the backrest) or functional sitting (forward leaning) position is recommended.
Here are some practical hints for using the sitting support adaptive equipment: Before beginning to work with a severely involved child in the forward-leaning sitting position, check that he or she can tolerate this position. The child must be able to tolerate hip and knee flexion to at least 90 degrees. The child may initially need prompts at all the following areas for sitting:
- Hip (to maintain pelvis position in the chair)
- Trunk (anterior and/or lateral support)
- Head (posterior and/or lateral support)
- Arms (forearm prompts)
- Legs/Feet
With all prompts in place, the child can practice active head control, usually by lifting the head from a flexed position. The stability of the trunk and shoulder girdle provided by the anterior trunk and arm prompts helps the child to extend the neck and head against gravity. At first, it may even be necessary to angle the arm prompts up in front of the child to give enough stability so that he or she can raise the head. When placing a child with poor head and trunk control into a front-leaning chair, be sure that the upper extremities are supported with the elbows under the shoulders for upper extremity weight-bearing. Many caregivers have noted that when a child who is accustomed to reclining is first placed in a forward-leaning position, there is a dramatic increase in drooling and coughing up of mucous and fluids. This is partly due to the child being in a position that encourages clearing the lungs. Start with short sessions in this position and gradually increase as the lungs begin to clear. (Bidabe, 1999)
Moving Towards Independence
Ideally, adaptive seating equipment should be used to teach sitting skills, and when the supports are systematically reduced and direct instruction is given to improve head and trunk control, many children can learn to function more independently in sitting. In some cases, the child can eventually progress to sitting on a regular classroom chair without support for short periods of time. The MOVE curriculum, an activity-based program for children with disabilities, describes the following sequence for how the prompts are best reduced for a child sitting in a front-leaning chair:
Typically, we remove either the trunk control prompts or the forearm prompts first. Often we alternate using trunk prompts and then forearm prompts depending upon the activity and need for arm use. The next prompts to be reduced are usually the leg prompts including ties to keep the feet in place. The prompts to keep the feet from pulling back are removed next, and lastly, the pelvic straps. (Bidabe, 1999, p.260)
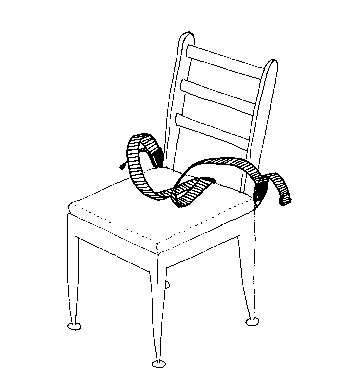
The MOVE curriculum additionally advises a unique pelvic positioning strap which can be used as an alternative to a typical seat belt to position the pelvis more securely in the chair. This gives a stable base for sitting postural control. It consists of two long straps attached at the back of the seat. The child sits on the straps, which are looped out over the thighs and attached down at the lateral edge of the seat (figure). This type of strap can also be used on a regular chair to give another option for practicing the motor skills involved with sitting. These straps, also known as pelvic harnesses, are often available with specially designed adaptive seating equipment.
Adaptive Equipment for Classrooms Series: Part 2 of 3
Adaptive Equipment for Classrooms Series: Part 3 of 3

